Fixing an Asus K53’s power jack
by alex
I fancy Asus laptops. They are not expensive and come well equipped. Plus, Asus is a well established company and their products tend to be, in my opinion, of good quality.
Unfortunately, the power jack of my wife’s Asus K53S started having problems after a couple of years. The connector from the charger started to feel loose when connected to the jack and the laptop would suddenly alternate between charging and discharging the battery.
After trying a different charger, it became clear that the problem was the power jack. I have changed it and since then the laptop has been working flawlessly. In what follows I describe the steps necessary to access the power jack, desolder it and solder a new one. This guide was constructed for an Asus K53S but it should work, with minor modifications on most, if not all, laptops of the K53 series.
Here’s the material you will need:
- New power jack (I ordered mine from ebay)
- Precision Philips screwdriver (#0 or #00)
- Soldering iron
- Desoldering pump
- Desoldering braid
- Solder
- Pair of diagonal pliers (potentially)
You will need to disassemble the laptop in order to access the power jack. Begin by laying the laptop down with its bottom side up. Remove the battery and remove the screws indicated in the following figure:
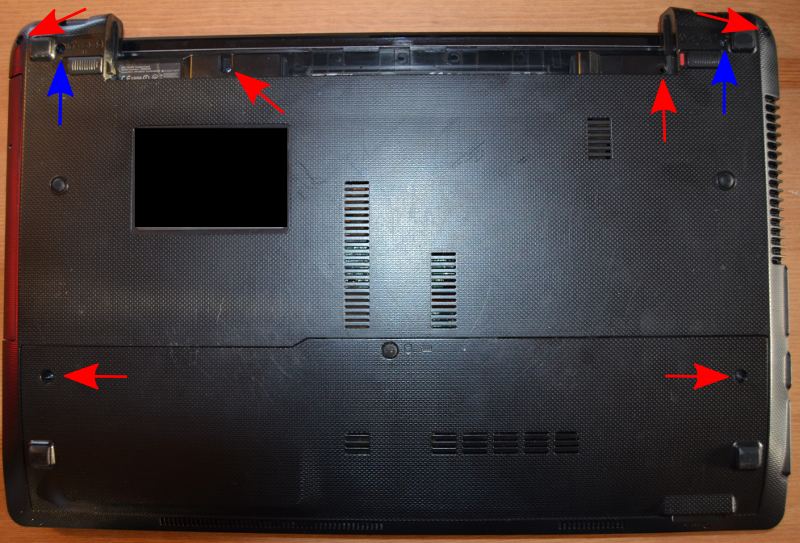
Fig. 1: Back side
The red arrow points to 2×6 screws while the blue one points to 3×6 ones.
Now remove the memory and hard drive compartment and remove the following screws (all 2×6):

Fig. 2: Memory and HDD compartment
Remove now the hard drive by sliding it. There is another screw beneath it that needs to be removed (2×3):

Fig. 3: Screw under HDD
Remove now the keyboard by using a flat screwdriver to push the three pins on top. You need now to remove three ribbon cables: one from the keyboard, another one from the power button and yet another from the touchpad. To release the one from the keyboard, simply pull the black restrainer. To remove the ones from the power button and touchpad you will need to rotate the retainer 90 degrees (see Fig.8 and Fig. 9). You can now remove the screws under the keyboard (again, all 2×6):

Fig. 4: Screws underneath the keyboard
Now turn the laptop around and remove the optical drive. You need now to remove three screws that are sitting at the optical drive bay (these are 2×3 screws)

Fig. 5: Screws under the optical drive
Turn the laptop around again and remove the top part (where the keyboard used to sit). You have now access to the motherboard. You will need to remove several cables (blue arrows) and screws (red arrows):

Fig. 6: Asus MB
Again, all these screws are 2×6.

Fig. 7: Locked retainer

Fig. 8: Unlocked retainer
Now that you have access to the jack you will need to desolder it. I recommend that you use, at least, a desoldering pump (these are very cheap anyway) and if possible desoldering braid. You should begin by applying flux to the old joints and the new solder on top (yes, you read well. You should apply new solder to desolder. ). Ideally you would desolder the piece and remove it intact. Honestly I found this hard to do. The old solder didn’t seem to melt and I was out of flux (except for the one contained in the core of the solder I was using). Therefore, what I did was to destroy the old jack and cut its contacts using a pair of diagonal pliers.
That made desoldering much easier.

Fig. 9: Old power jack

Fig. 10: Soldered jack with destroyed one next to it
Soldering the new jack should now be easy. After that you just need to put everything back in reverse order.
And that’s it!
P.S. I am not responsible for any damage your laptop incurs in following this guide. If you have absolutely no idea of what you’re doing, you’re better off contacting a repair service.

This work is licensed under a Creative Commons Attribution-ShareAlike 4.0 International License.
Thank you very much 😉
Thank you for this accurate & concise guide. The pictures really helped give me confidence to take on the disassembly needed. And end up with nothing broken and no left over screws!
Thanks a lot for this! just fixed my K53SV with this tutorial. The tip to cut the legs of the old power jack off to ease desoldering saved my day (and laptop)!
Great tutorial with so good pictures!
Thanks a lot!
Best blog.